Some 70's W900's

Truck Shop

Well-known member
While looking at the A-Car-there were eleven W900's setting around too. One is a 79 W900a L-Hood 3408, DT480P rearends, 13sp X 4 brownie.

Truck Shop005.JPG004.JPG006.JPG007.JPG003.JPG
 

Truck Shop

Well-known member
79 w900

This one has a 7FB 400 Cat with retarder, RTOO15sp, 8 bag air on a long aluminum frame with outboard drums on SQHD's.
The back of cab has slight damage when box was lowered at some time, but it's fixable and I have the rivet gun and rivets
to repair it. I made an offer on it and he wants to sell it, has to hash it over with his son.

Truck Shop

003.JPG016.JPG019.JPG020.JPG017.JPG
 
Last edited:

rzucker

Well-known member
Best of luck snagging this one without the "sentimental" bs. And take that "Aerodynamic" bugshield and toss it as far as you can. It does not belong on a 900A.
 

Truck Shop

Well-known member
I agree on the sentimental part, but I asked him if he would sell any of them. Yes on this one-it has air ride he only wants walking beam for
field use. And that bug shield is wonderful on there-that's going to stay:rolleyes:

Truck Shop
 

rzucker

Well-known member
I agree on the sentimental part, but I asked him if he would sell any of them. Yes on this one-it has air ride he only wants walking beam for
field use. And that bug shield is wonderful on there-that's going to stay:rolleyes:

Truck Shop
I was yanking your chain about the bugshield.;) Even though I think an old school vertical style is more appropriate for an older 900A.:avid
 

Truck Shop

Well-known member
I was yanking your chain about the bugshield.;) Even though I think an old school vertical style is more appropriate for an older 900A.:avid
Oh that model of bug shield on that 900 has been known to increase fuel mileage by 35%. And when coming out of turn two heading into turn three
drafting on that Hunt truck it will help you cross the finish line dead last;):p:confused::eek::(:cool:.

Truck Shop
 

rzucker

Well-known member
Oh that model of bug shield on that 900 has been known to increase fuel mileage by 35%. And when coming out of turn two heading into turn three
drafting on that Hunt truck it will help you cross the finish line dead last;):p:confused::eek::(:cool:.

Truck Shop
Hey now... The Schneider truck blocked me, he was in cahoots with the Hunt guy.
 

Truck Shop

Well-known member
Well while I was setting in the grand stand I watched that Leonardo go right by and take the checkered:(

Truck Shop
 

rzucker

Well-known member
Well while I was setting in the grand stand I watched that Leonardo go right by and take the checkered:(

Truck Shop
Heh, Leonardo... Haven't seen one of theirs for a few years since Smith frozen foods quit doing sweet corn up here. Seems to me they had some interesting old toys in the M-F yard last time I was down that way. Wow, probably 10 years ago.
 

Truck Shop

Well-known member
Here's another one I've been looking at, 77 model 350 SC, 6X4, SSHD's. Only one bad spot in the hood and that's easily fixable. The grill surrounds are not that
expensive. This wagon is in pretty fair shape. And it's for sale.

Truck Shop

00l0l_dhYZKlcmhge_1200x900.jpg
 

rzucker

Well-known member
Here's another one I've been looking at, 77 model 350 SC, 6X4, SSHD's. Only one bad spot in the hood and that's easily fixable. The grill surrounds are not that
expensive. This wagon is in pretty fair shape. And it's for sale.

Truck Shop

View attachment 1631
That's a good looking truck. Build that 350 into a "poor man's mechanical N-14" and she should run.
I once combined a pile of parts on an old FFC 335 using an NTC 400 cam, pulse manifold and holset turbo, low compression 400 pistons, used 350 injectors and the 335 pump. I think I set the timing around 23* retarded... It was a miserable cold starter, but once it was warmed up and running it ate Cats for breakfast and lunch. All that and no aftercooler, but it would never go over 900* on the pyro. If it had been a wide nose Pete I would have tried to jam air to air in there somewhere. It was just a little single drive needlenose, but with a set of single axle Merritt doubles I could net 34 ton.
 

Truck Shop

Well-known member
Looked at this 73 W900A/L it has 325 HP 1693, 15sp on SQHD's. It originally had a 12V-71, It's for sale with a spare cab for parts and a BCII 400 Cummins.
But the hood had some crummy fiber glass repair done to it, it would take some major work to redo it.

Truck Shop

004 (2).JPG017.JPG011.JPG002 (2).JPG007.JPG
 

LowBoy

Well-known member
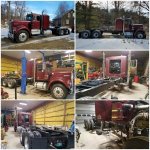
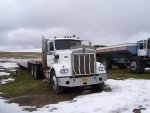
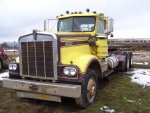
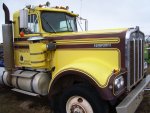
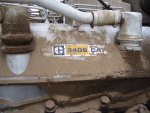
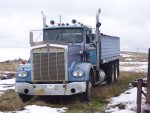
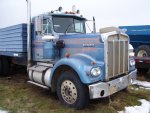
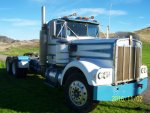
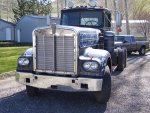
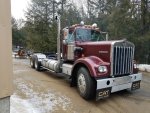
Here's my current project; 1978 W900A. 3406A PCTA, Fuller RTO 12515, Eaton DS 402's @ 4:33...KW 8 bag air.

Found this truck accidentally through a Facebook friend who knew I was searching for one to run daily. Only 4 hours away in New Jersey, I drove down and looked at it, and a couple weeks later drove it home and ripped into it. The truck was owned by a retired 82 yr. young fellow that bought it in 2003 to just tinker on in his driveway, and make it to a few antique truck shows with. Hadn't ever run north, it was always between NJ and Florida so the frame and everything is mint condition, no corrosion whatsoever. He was the 3rd owner. He gave me a bunch of parts including a brand new headliner, all the interior is like new. Truck only has 742K original miles on it. Originally had torsion bar suspension, the 2nd owner stretched it to 252" and rolled 8 bag KW under it, saving me thousands in work right there. Has a reman Fuller 15 speed with the sticker on the side, still primer colored.

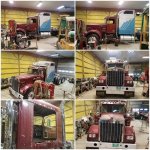
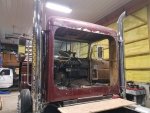
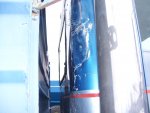
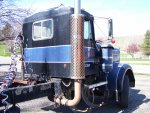
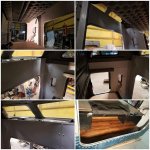
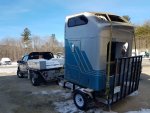
Most guys probably would have kept the 36" bunk I know, call me crazy. I found an Aerodyne II (really wanted a first gen Aerodyne but try finding one in decent shape nowadays,) and I wanted to open up the holes so I can get the seats back further. I bought the Peterbilt Unibilt rings and boot for the big opening and cut the cab and bunk open and installed them. Now I can put the seat back inside the bunk. I'm older now and I put practicality in front of "coolness" in most cases, trying to preserve as much cool as I practically can.

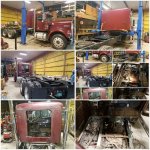
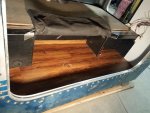
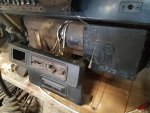
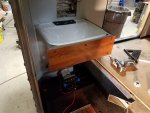
While in the shop I decided to pull the plywood floorboards and redid those in new PT plywood, two 1/2" pieces laminated together cuz 1" is tough to come by around these parts. Screwed them together in a 2" grid as well, they will outlast me that's for sure. While the floor's out and all the crispy 38 year old air lines were accessible, I changed every one of them from medium pressure hose to nylon. Cleaned up all wiring behind the dash by cutting anything that didn't belong out and cleaned up what is supposed to be there.

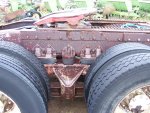
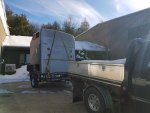
List of other work includes but not all inclusive is; 8 new air bags. 2 new torque rods on rear housing. Maxi cans, installed suspension dump valve, 5th wheel slider from the rails to the plate is new, exhaust redone and added a small muffler underneath to tone it down, reconfigured fuel tanks and added a right side step box where a tank used to be, added a split fuel/hydro tank for wetline (I run a detachable lowbed/RGN,) so I carry a total of 250 gallons of fuel now.

What else....wheew. Installed PTO/pump for wetline and all new plumbing, and searching/locating/fetching some used A model parts was a big part of the project as much as the actual work. Mocking up the bunk to fit right and look right was a process. The Aerodyne II is really designed for B model cabs, being 3" higher than an A. So we had to dry-fit the bunk multiple times to adjust the height of the mounts on the frame as well as determine the right elevation of the hole for the Unibilt ring. End result is it looks good to me.

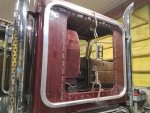
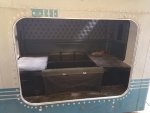
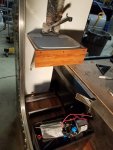
The sleeper interior was mouse infested, having sat on a pallet in a guys back yard for well over 8 years. Stunk so bad we had to throw most of the upholstery away, but saved some of the Seattle package on the ceiling, back wall and doors. I then opted to use white fiberglass wallboard on the front and sides as used in milking parlors, kitchens, sanitary places, etc. for the simple reason of keeping it clean, brighter in there, and neat looking in contrast to all upholstery. I dreamed of having a little RV sink in a bunk someday so when I wake up in the morning, I can splash water on my face, brush my teeth, etc...so I got a little sink, 6 gal. tank and a 12V pump and put that in the passenger side corner. Nice little touch that I always wanted.

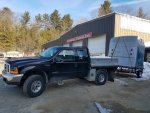
The bunk is currently in the paint shop, so hope to mount that next week. Got a nice enclosed headache rack with stainless steel locking doors to go behind that too after.

Removed air horns and cab lights and sealed them up so I don't take any water on through them. Put LED inserts in the lights too.

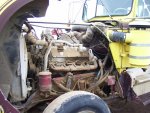
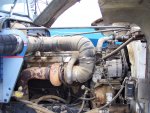
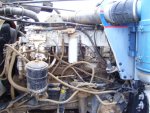
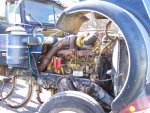
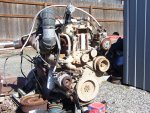
Next big thing to do is, I bought a spare A engine with a Jake, so I'm removing that off that engine, cleaning things up, giving it a tune up kit, and installing that on this one. Also doing exhaust manifold studs and gaskets and a new water pump, belts and hoses. Ain't much left after all this except for tweaking things as I go along.

Should be done and rolling hopefully by the first week in April...

Collage; A model 1st phase of rebuild 2-2017.jpg

Collage; A model 2nd phase of rebuild 3-2017.jpg

Collage; A model 2nd phase of rebuild no. 2)  3-2017.jpg

Unibilt Frame install..jpg

Unibilt hole cutout..jpg
 

Truck Shop

Well-known member
Nice job! Too bad-I know where a 79 VIT sleeper is setting at least it was there a year ago. Been setting a long time probably a mouse house by now.

Truck Shop
 

LowBoy

Well-known member
Thanks. Yeah I'd have loved to have found a VIT bunk. I did out in Arizona and he wanted $2500.00 for it. Couldn't find a way to ship it out east without breaking the bank, and then it'd probably need as much work as i just did to this one. So for $600.00, a 120 mile Saturday trip and some effort, i got this which I'm happy with how it looks.
 

LowBoy

Well-known member
Almost there...

Friday 3-24-2017; Got this thing roadworthy and drove it 12 miles to the painter, so he can do the back of the cab before we set the bunk on permanently on Monday 3-27-2017. Came a long way from the day I got it home on January 29th. Nothing worked in the cab, the previous owner had someone remove the series parallel switch and put a 12V starter in, then left the wires dangling in mid air. I had to figure that out but now everything works as it should finally.

Once bunk is mounted, it's back in the shop for a couple of days to tie the loose ends up and that's it...DONE and headed to work.

View attachment 1672View attachment 1673View attachment 1674A Model,headed to paint cab~3-24-17 #6.jpg
 

Attachments

Last edited:
Top