From 1999 to about 2007 or so Super Duty chassis cabs were plagued with delaminating fuel tanks. The galvanizing inside would flake off and clog the fuel pickup assembly, and then rust would attack the tank from inside adding to the problem. Eventually the pickup will become so clogged the truck won't run, especially in cold weather when the fuel is thicker. What will follow is a how to on disassembling and cleaning the assembly, saving the cost of replacement or getting back on the road when parts aren't immediately available.
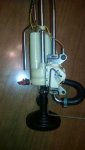
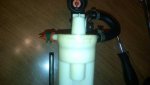
This is the fuel blender we will be disassembling. First loosen the hose clamp on the black fuel pickup shoe at the end of the assembly and slide off. There is a primary screen that can be removed from this shoe by prying with a small screwdriver so it may be cleaned. Next gently twist and tug the U shaped hose from the stainless tube, do not attempt to remove it from the plastic housing. Now you may gently twist and tug the white plastic assembly from the fuel pickup tube. Set the tubing and fuel guage sender in a safe place.
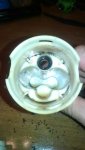
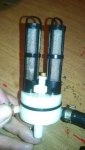
Note the two plastic tabs at the bottom of the housing. There is a third tab on the opposite side. To disassemble insert 3 small blade screwdrivers in the gap on the bottom of the assemble directly below the tabs and simultaneously pry lightly so they may slide past the formed clips. Be very careful you don't pry too hard and break the molded clips, use just enough force so they will clear and pull the bottom out of the assembly.
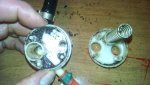
Here is what you will have. The micro screens simply lift off. Carefully remove the O-ring.
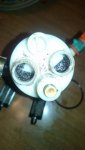
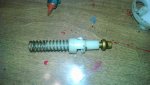
This amount of debris is minor compared to the first time I did this job. Note the brass plunger and keep it in mind for the next step. It can take off on you if you aren't careful!
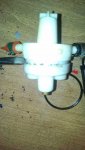
In the slot the O-ring occupied, use a screwdriver and gently twist. You will hear some snapping noises, this is OK. In the next photo you'll see what is happening. When you hear the snap noise, reposition the screwdriver by 90° and twist again until you hear a similar snap, then reposition 90° etc. Repeat until the assembly comes apart. Don't rush this or you can break the retaining pins and it will be junk.
This is the fuel blender we will be disassembling. First loosen the hose clamp on the black fuel pickup shoe at the end of the assembly and slide off. There is a primary screen that can be removed from this shoe by prying with a small screwdriver so it may be cleaned. Next gently twist and tug the U shaped hose from the stainless tube, do not attempt to remove it from the plastic housing. Now you may gently twist and tug the white plastic assembly from the fuel pickup tube. Set the tubing and fuel guage sender in a safe place.
Note the two plastic tabs at the bottom of the housing. There is a third tab on the opposite side. To disassemble insert 3 small blade screwdrivers in the gap on the bottom of the assemble directly below the tabs and simultaneously pry lightly so they may slide past the formed clips. Be very careful you don't pry too hard and break the molded clips, use just enough force so they will clear and pull the bottom out of the assembly.
Here is what you will have. The micro screens simply lift off. Carefully remove the O-ring.
This amount of debris is minor compared to the first time I did this job. Note the brass plunger and keep it in mind for the next step. It can take off on you if you aren't careful!
In the slot the O-ring occupied, use a screwdriver and gently twist. You will hear some snapping noises, this is OK. In the next photo you'll see what is happening. When you hear the snap noise, reposition the screwdriver by 90° and twist again until you hear a similar snap, then reposition 90° etc. Repeat until the assembly comes apart. Don't rush this or you can break the retaining pins and it will be junk.